It’s done. Finally. Whew.
Our deck has been a point of contention between me—the whirling dervish—and Alex — the pondering engineer— since I moved in.
I love being outside, outside, outside. If I could figure out how to relocate my desk, day-job work computer, external monitor out to the deck, I would!
He loves air conditioning.
The original deck was poorly constructed by whom we believe to be a bunch of drunken folks who were unable to contemplate planning, straight lines or long-term results. Time for us to do some deck building.


It’s been falling apart for a long time. Husband replaced a few boards a couple of years ago before a party lest someone put their big foot (his, no doubt) through one of them. I’ve repeatedly re-pounded nails (yes, nails) into the boards lest I walk bare-footed across them and need stitches.
It was time.
I put my foot down. Luckily, not through a deck board.
The planning began in April, with the first de-construction starting on May 14th. Alex began weekly traveling before Memorial Day and hadn’t been home for a full week until last week. We still managed to put the finishing touches on yesterday and call it done!
Here’s how to survive deck building and stay married:
1. Decide what you want.
I spent hours drooling over Pinterest decks, but had to concede that logic should prevail on the design. We decided to tear off the rails and decking and see what kind of shape the frame was in.


2. How will you deconstruct? With Leverage!
A couple of different sized pry bars turned out to be the simplest way. Position the small one under a screw or nail head, pound it in tight and leverage against it. Do that along the board and then get the big pry bar and using my body weight or Alex’s forearms, heave the wood up.
4. Getting rid of the old boards?
We opted for the Bagster. Do pay attention to the instructions, folks, and don’t over fill. We cut the boards to fit, stacked them in, made a call and whoosh, they were gone.
5. Do you want the deck to last 10 years?
20? Would 5 be enough? This answer leads to the deck material. We choose premium pressed lumber and metal balustrades.
6. Purchase adequate supplies.
Decide what type of screws — not the assorted nonsense our predecessors used—will work best for your boards and design. In our case 3.5” green deck screws. Although your local hardware store can probably do these calculations for you, the engineer stepped up to compute the number of boards required. He ended up off by two. Not bad!


7. Green?
To match the deck stain color. Long ago the decks at my Montana house were redwood. For that money, the stain was a clear coat. For pressure treated wood, I indulged in my favorite color: green. Dark, solid green stain for the rails and gates (basically vertical pieces) and a semi-transparent green for the decking (any horizontal piece). Remember to get a tiny test can first so you can try out the color. We skipped our first choice and opted for one darker.
8. Power.
Do you have fully charged cordless drills for the screws (his and hers), extension cords for the electric drill, a square for aligning the screws from board to board, a carpenter’s pencil–or two–a couple of measuring tapes, saw horses, a table saw, a jigsaw for cutting around posts, and a circular saw for cutting off the ends of the board—once they are screwed in. We figured out that was entirely easier and gave a neater edge than pre-cutting them.

We chose to lay our boards straight rather than duplicate the bad angled design we inherited. We laid them tight against each other.

My job was drilling the holes, Alex’s putting the screws in. Ladies, if I ever win the lottery, I am creating power tools with as much power as the big ones, but to fit our smaller hands.


Between thunderstorms, it took approximately 80 hours for the two of us to complete this project. Not bad for non-professionals.

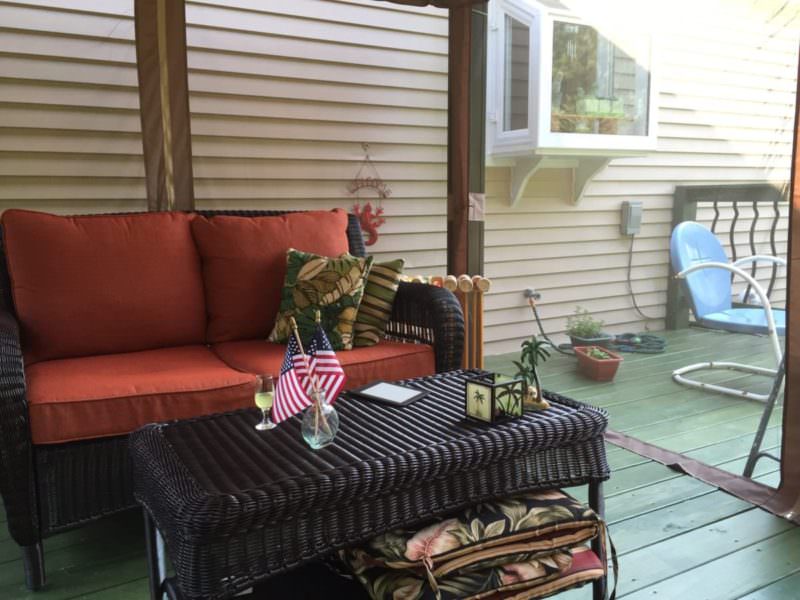
Finishing Our Deck Building!
Finding the right deck furniture and a gazebo was an adventure all its own. My quick blurb is: the furniture from Target was simple to put together—I did it alone in about 2.5 hours. The gazebo, also from Target, was a nightmare. But it’s in place now and I’m a happy woman!
Friday nights if you’re trying to find us, it’s wine time on the deck!


**
This Old House deck building instructions.


Guess who I am calling when I need a new deck?
I love doing this stuff, you know that, right?
I love your deck! It’s such a happy place!
It is my happy place! Come on over!
I’m with you Rose, I love being outside and try to every time the weather allows. That looks like a huge project. But you two did an amazing job. It looks outstanding! I hope it lasts you many more years.
Everything about life feels better outside, doesn’t it, Susan?
Gorgeous new deck, Rose! I wish I could join you for ‘wine time!’
Just pop over to Pburgh on a Friday! 🙂
Wow, the new deck looks awesome.
Thanks!
Well, we have a deck that needs replaced and you seem to know what you are doing. So I hear you are coming to town? We have tools. I am thinking if you just rip it off the new one will follow!!!
Be right there. You have wine, right?
Oh Rose, you did a fabulous job and I so wish I could pop over next Friday night to enjoy the hummingbirds and the wine. Congratulations, I know how much hard work that was because until this year my husband and I did everything ourselves. I also know the great amount of well deserved satisfaction once the job is done. BTW – I hope you do design those power tools – the small ones meant for us often really don’t do the job. You design and I’ll test, how’s that?
Thank you, Lenie! Pop over anytime you find yourself in Pittsburgh–the deck is open to all writers!
I would love to design those tools! I had to stop using his big guy drill because unless I wedged it against my thigh, it would jerk out of my hand and hurt my wrist. My drill just did not have enough oomph to get the job done.
We are planning now for our eventual downsize, so I am going to live every possible minute on this deck!
No kidding?! I am convinced that those who lived in our home before us and installed our deck did it as an “activity” during a drinking party. I think at some point one has to TRY to be that “unleveled”. After digging down a foot or so to pour new footers for our posts (again due to “level” issues) I was further sure of my assumptions as large amounts of glass from broken bottles served as their “filler” for under the posts. Unbelievable.
Your deck looks lovely. I would take a glass of red please 🙂 Cheers to a job well done!
Ha! Diana! Well knowing you and my nephew, I’m sure that the new deck is a 150% improvement over the old one. It’s amazing what people will do when drunk and scary that they do it with power tools!
Job well done; looks great.
Thanks, Tim.
The deck looks great. Congratulations. Fortunately mine only needs to be refinished. So I’ll get started on that before I have a bigger project before me..
Now that we have this, Ken, I’m glad Alex didn’t let me refinish the old one 5 years ago when it could have (mostly) been saved. This one is utterly wonderful!
Oh, wow! What a beautiful deck!
I’m sure loving it! We had wine there last night and watched the hummingbirds: Frederico (he’s the bully), Sophia (the red one), and Pietro (he’s the tiniest).
Fabulous Rose, that’s definitely a live outside space for as long as the weather allows!
I’m trying to figure out how to get a permanent roof on the canopy. Don’t tell Alex! ha ha
Nice decking!
It is nice to sit outside and enjoy the sun (not that we have much in the UK!)
The long, cool summer nights and the birds chirping as the sun rises =bliss!
Applause! Wow what a beautiful transformation! Like you, every moment I can get outdoors I grab with gusto. Your deck looks wonderful…enjoy!
If you ever find yourself in Pittsburgh, Jacquie, please stop by for wine-time with us!